flowchart TB
modeler([Modeler]):::user

python["Ribasim Python"]
modeler-->|prepare model|python

core["Ribasim core"]
modeler-->|start|core

subgraph qgisBoundary[QGIS]
    QGIS[QGIS Application]:::system_ext
    qgisPlugin["Ribasim QGIS plugin"]
    QGIS-->qgisPlugin
end
modeler-->|prepare model|qgisBoundary

model[("input model data
        [TOML, GeoPackage,
         Arrow, NetCDF]")]
qgisPlugin-->|read/write|model
python-->|read/write|model
core-->|simulate|model

output[("simulation results
         [Arrow, NetCDF]")]
core-->|write|output

class qgisBoundary boundary

%% class definitions for C4 model
classDef user fill:#ABD0BC
classDef system_ext fill:#D2D2D2
classDef boundary fill:transparent,stroke-dasharray:5 5
Installation
In this document, we describe how to install the different components of Ribasim. First the components and their relation are introduced, then installation instructions per component follow.
1 Components
The figure below illustrates the relation between the various components of Ribasim.
There are three main components of the Ribasim software package. They are the Ribasim core, the Ribasim Python package and the Ribasim QGIS plugin.
The core is a command line interface (CLI) that runs Ribasim simulations. It is written in the Julia programming language and is built on top of the SciML: Open Source Software for Scientific Machine Learning libraries, notably DifferentialEquations.jl.
The Ribasim Python package is available to build, update and analyze Ribasim models programmatically. One can also use Ribasim Python to build entire models from base data, such that your model setup is fully reproducible.
Ribasim uses GeoPackage files to store the model database (database.gpkg). QGIS works well with GeoPackage files, making it a good application to visualize Ribasim models. Deltares also provides the iMOD QGIS plugin, which can be used to view the timeseries in the Ribasim results.
Note
The components don’t depend on each other, so you can install what you need. When using multiple components, all component versions must be the same. If you receive a model, the Ribasim version used to create it is written in the TOML file. Older releases can be found in the Release assets on GitHub.
Note
To update an existing installation of Ribasim, follow the same installation on this page. Change the version number in the command or download link to install a version other than the latest release, or download directly from the Release assets on GitHub.
For a guide on how to update existing models to new Ribasim versions, see the guide on updating Ribasim.
2 Install Ribasim core
Ribasim is typically used as a command-line interface (CLI). It is distributed as a .zip archive, that must be downloaded and unpacked. It can be placed anywhere, however it is important that the contents of the zip file are kept together in a directory. The Ribasim executable is in the main folder.
2.1 Windows installation script (recommended)
The easiest way to install Ribasim on Windows is to use the installation script. Open a terminal and run:
powershell -ExecutionPolicy ByPass -c "irm https://ribasim.org/install.ps1 | iex"This will download and install the latest version of Ribasim to %USERPROFILE%\.ribasim and automatically add it to your PATH. After installation, you can run ribasim --help from any directory.
You can set the RIBASIM_HOME environment variable if you wish to install it in a different directory. Use the manual installation to install older versions of Ribasim, or if you don’t want to add it to your PATH.
2.2 Manual installation
To download the Ribasim core manually, download the appropriate zip file for your operating system:
- Ribasim executable - Windows: ribasim_windows.zip
- Ribasim executable - Linux: ribasim_linux.zip
Note that we currently only support and provide binaries for Windows and Linux, for the x86_64 architecture.
To check whether the installation was performed successfully, open a terminal and go to the path where the executable is for example C:\bin\ribasim\. If you are using cmd.exe type ribasim --help, or for PowerShell ./ribasim.
This will give the following message if it is installed correctly:
Usage: ribasim [OPTIONS] <TOML_PATH>

Arguments:
  <TOML_PATH>  Path to the TOML file

Options:
  -t, --threads <#THREADS>  Number of threads to use. Defaults to the JULIA_NUM_THREADS environment variable, and when unset, to using all (hyper)threads.
  -h, --help                Print help
  -V, --version             Print version
2.3 Adding Ribasim to Path on Windows
If you used the installation script, Ribasim is already on your PATH. For manual installations, you can add the Ribasim executable directory to your Windows Path environment variable.
The Path environment variable tells Windows where to look for programs when you type their name in a terminal. By adding Ribasim to your Path, you can type ribasim from any folder instead of having to navigate to the Ribasim folder first or typing the full path like C:\bin\ribasim\ribasim.exe.
- Search “Environment Variables” in the Windows search bar
- Click “Edit the system environment variables”
- Click on the “Advanced” tab
- Click the “Environment Variables…” button at the bottom
- In the top section “User variables”, scroll down and find “Path”, then click “Edit…”
- Click “New” and enter the full path to your Ribasim directory (e.g.,
C:\bin\ribasim, notC:\bin\ribasim\ribasim.exe) - Click “OK” three times to close all dialogs
- Close any open terminals/command prompts and open a new one
3 Install Ribasim Python
The Ribasim Python package (named ribasim) aims to make it easy to build, update and analyze Ribasim models programmatically.
The Ribasim Python package is registered in PyPI and conda-forge and can therefore be installed with pixi, uv, pip or conda. We recommend Pixi, but installation instructions for all are provided below.
Install Pixi following the Pixi installation documentation. Note that if the recommended installation methods don’t work due to restriction on your PC, the zipped executable is likely to still work.
Open a terminal in your project directory, and create an empty pixi environment:
pixi initNow add Ribasim Python:
pixi add ribasim==2025.6.0To start Python, run:
pixi run pythonIf you wish to check what is installed in your workspace, run pixi list. When you run into what seems like installation issues, try pixi clean, followed by pixi install.
If your editor does not automatically detect the right Python environment, point it to .pixi/envs/default/python.exe. Starting your editor via Pixi will also help it find the environment since it will already be active. For Visual Studio Code, you can run pixi run code . to open your workspace.
Install uv following the instructions in the uv documentation.
Open a terminal in your project directory, and create an empty uv project:
uv initNow add Ribasim Python:
uv add ribasim==2025.6.0To start Python, run:
uv run pythonpip install --upgrade ribasim==2025.6.0Ribasim is available in the conda-forge channel. Miniforge is the preferred conda-forge installer and includes conda, mamba, and their dependencies. It may not work well when combined with the Anaconda default channel, see transitioning from defaults.
conda install -c conda-forge ribasim=2025.6.0For Ribasim Python documentation please see the examples and API reference.
4 Install Ribasim QGIS plugin
The Ribasim QGIS plugin requires QGIS 3.34 or higher, and the pandas package in the QGIS Python environment (which is the case by default).
4.1 Install from QGIS Plugin Repository (recommended)
The easiest way to install the Ribasim QGIS plugin is through the QGIS Plugin Repository.
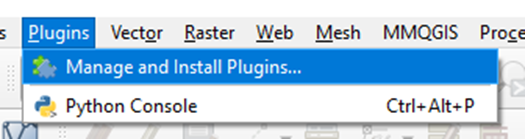
In QGIS, go to Plugins menu > Manage and Install Plugins…
Select “All” and search for “Ribasim”:
- Type “Ribasim” in the search bar
- Select the “Ribasim” plugin from the results
- Click “Install Plugin”
For more information on installing plugins in QGIS, see the QGIS documentation on installing plugins.
After installation the Ribasim icon should appear on the QGIS toolbar:

See the Ribasim QGIS guide for how to use the plugin.
4.2 Alternative: Install from ZIP file
If the plugin repository method doesn’t work or you need a specific version, you can manually install the plugin from a ZIP file.
Download ribasim_qgis.zip:
- QGIS plugin: ribasim_qgis.zip.
In QGIS, go to Plugins menu > Manage and Install Plugins…
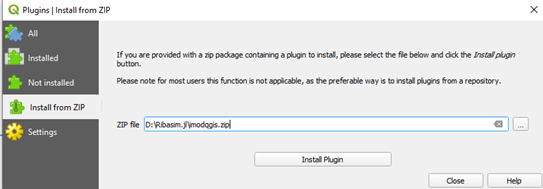
Select “Install from ZIP”:
- Browse to the
ribasim_qgis.zipfile containing the plugin that was downloaded earlier - Click “Install Plugin”
4.3 Install iMOD plugin
In QGIS, navigate to “Plugins > Manage and Install Plugins > All”. In the search bar, type: “iMOD”. Select the iMOD plugin, and click “Install”.
At least version 0.5.3 of the iMOD plugin is required.
The Time Series widget from the iMOD plugin is used for visualizing Ribasim results, which is described in the results section. Documentation on the Time Series widget can be found in the iMOD documentation.